

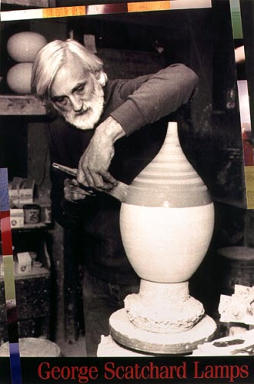
George Scatchard Pottery

© 2015 George Scatchard Pottery
website design Wolf Multimedia Studio
POTTER'S CORNER
The clay
I don't use premixed clay for several reasons. The first is that it is expensive to ship all that water. Water is about 25% of most clay bodies. The second is that I need to
knowwhat is in my clay mix to be sure of good thermal properties and glaze fit. The third is that most commercial clay bodies are made with additives that make it run through
the mixing machinery more easily in order to save money. I believe that these lubricating additives make a clay much harder to work with because it doesn't stand up well and
tends to stretch too easily. My clay mixtures are made from American clays and minerals. I have made a device to test thermal expansion properties of the finished product so I
can guarantee oven proof ware for baking. In addition I am able to control the working properties of my clay so it will hold the shapes I am striving to create better than
commercially prepared clays. This allows the light well thrown bowls I am known for.
I mix my clay in a 20 gallon stainless steel tub with a hand held mortar mixer. I mix the dry ingredients first
then add water. I use 100 pounds of dry materials and about 7 gallons of water in each batch. This makes a
soft mud that ages nicely in a few days. To dry the clay for use I lay it out on slabs of plaster.
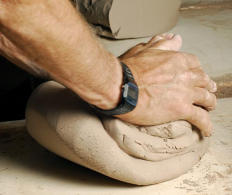
To prepare the clay for throwing, I use the kneading technique and fold the clay over and press it together
about 100 times to remove any air bubbles and mix it thoroughly.
Green Glazing
In the late 1970's, during the first energy crisis I decided to liminate bisque firing from my process. The point
was to save time and space. It took a long time to load and fire the bisque and unload the kiln again. We also
had to have space to store all the bisque ware. The fuel savings were not as important as the time and space
we saved.
There are 2 main ways that potters apply glaze to raw clay.
The problem is that glaze tends to fall off of the dry clay as
it shrinks while drying. One answer is to glaze wet pots so the clay and glaze can shrink together as they dry. This means
that each pot has to be glazed when when it is just dry enough to be glazed. That didn't seem practical with the volume of
pots I was making. The other method is to glaze dry pots with glaze mixtures that have less water in them to avoid softening
the dry clay. By adjusting the clay body to have limited shrinkage and the glazes to contain less water, I was able to
successfully make even quite thin ware with almost no losses. This is the system I still use today. The biggest change we
made was to eliminate Kaolin from glaze recipes. China clay in general has a huge water requirement. We substitute a ball
clay with a very low water requirement. This makes the glaze adhere well and makes the coating much tougher and easy to
handle.
Ever since the early days, I have done most of my glazing on the wheel. This is a great way to glaze greenware because the
pot is unlikely to be broken as it sits on the wheel. Another nice feature of this method is that layers of different glazes can
easily be combined for blended effects
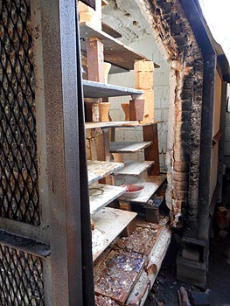
The kiln
My kiln was built in 1964 to fire the large planters, fountains and garden lights I
was making at the time. It is a 100 cubic foot updraft car kiln with two burners
that was designed to fire with high pressure propane. These days high pressure
propane is not allowed by the local gas companies, so I fire with kerosene. The results are the same as propane, but it is harder to
get really good oxidation in the beginning of the firing. I am using home made burners with siphon type air atomizing nozzles like
those used for waste oil systems. This system uses air pressure to atomize the kerosene and requires a good size compressor to
provide the air. This type of system can also work with waste oil, diesel fuel, heating oil or vegetable oil. I use kerosene because it
doesn't get as thick in the Winter.
Here are some videos on Instagram:
Throwing a bowl
https://www.instagram.com/p/BPVzpYEBmBa/?taken-by=georgescatchardpottery
Trimming a bowl
https://www.instagram.com/p/BPiK7g6B1qw/?taken-by=georgescatchardpottery
Glazing inside of bowl
https://www.instagram.com/p/BPS-6b1B0-6/?taken-by=georgescatchardpottery
Putting a handle on a pitcher
https://www.instagram.com/p/BXyRTNtjQDk/?taken-by=georgescatchardpottery
Making big planter
https://www.instagram.com/p/BT2LZs2jcSM/?taken-by=georgescatchardpottery


George Scatchard Pottery

© 2015 George Scatchard Pottery
website design Wolf Multimedia Studio
POTTER'S CORNER
The clay
I don't use premixed clay for several reasons. The first is
that it is expensive to ship all that water. Water is about
25% of most clay bodies. The second is that I need to
knowwhat is in my clay mix to be sure of good thermal
properties and glaze fit. The third is that most
commercial clay bodies are made with additives that
make it run through the mixing machinery more easily in
order to save money. I believe that these lubricating
additives make a clay much harder to work with because
it doesn't stand up well and tends to stretch too easily.
My clay mixtures are made from American clays and
minerals. I have made a device to test thermal expansion
properties of the finished product so I
can guarantee oven proof ware for baking. In addition I
am able to control the working properties of my clay so it
will hold the shapes I am striving to create better than
commercially prepared clays. This allows the light well
thrown bowls I am known for.
I mix my clay in a 20
gallon stainless steel tub
with a hand held mortar
mixer. I mix the dry
ingredients first then add
water. I use 100 pounds of
dry materials and about 7
gallons of water in each
batch. This makes a soft mud that ages nicely in a few
days. To dry the clay for use I lay it out on slabs of
plaster.
To prepare the clay for throwing, I use the kneading
technique and fold the clay over and press it together
about 100 times to remove any air bubbles and mix it
thoroughly.
Green Glazing
In the late 1970's, during
the first energy crisis I
decided to liminate
bisque firing from my
process. The point was
to save time and space.
It took a long time to load
and fire the bisque and
unload the kiln again. We
also had to have space
to store all the bisque
ware. The fuel savings
were not as important as the time and space we saved.
There are 2 main ways that potters apply glaze to raw
clay. The problem is that glaze tends to fall off of the dry
clay as it shrinks while drying. One answer is to glaze
wet pots so the clay and glaze can shrink together as
they dry. This means that each pot has to be glazed
when when it is just dry enough to be glazed. That didn't
seem practical with the volume of pots I was making. The
other method is to glaze dry pots with glaze mixtures that
have less water in them to avoid softening the dry clay.
By adjusting the clay body to have limited shrinkage and
the glazes to contain less water, I was able to
successfully make even quite thin ware with almost no
losses. This is the system I still use today. The biggest
change we made was to eliminate Kaolin from glaze
recipes. China clay in general has a huge water
requirement. We substitute a ball clay with a very low
water requirement. This makes the glaze adhere well
and makes the coating much tougher and easy to
handle.
Ever since the early days, I have done most of my
glazing on the wheel. This is a great way to glaze
greenware because the pot is unlikely to be broken as it
sits on the wheel. Another nice feature of this method is
that layers of different glazes can easily be combined for
blended effects
The kiln
My kiln was built in 1964 to
fire the large planters,
fountains and garden lights
I was making at the time. It
is a 100 cubic foot updraft
car kiln with two burners
that was designed to fire
with high pressure
propane. These days high
pressure propane is not allowed by the local gas
companies, so I fire with kerosene. The results are the
same as propane, but it is harder to get really good
oxidation in the beginning of the firing. I am using home
made burners with siphon type air atomizing nozzles like
those used for waste oil systems. This system uses air
pressure to atomize the kerosene and requires a good
size compressor to provide the air. This type of system
can also work with waste oil, diesel fuel, heating oil or
vegetable oil. I use kerosene because it doesn't get as
thick in the Winter.
Here are some videos on Instagram:
Throwing a bowl
https://www.instagram.com/p/BPVzpYEBmBa/?taken-
by=georgescatchardpottery
Trimming a bowl
https://www.instagram.com/p/BPiK7g6B1qw/?taken-
by=georgescatchardpottery
Glazing inside of bowl
https://www.instagram.com/p/BPS-6b1B0-6/?taken-
by=georgescatchardpottery
Putting a handle on a pitcher
https://www.instagram.com/p/BXyRTNtjQDk/?taken-
by=georgescatchardpottery
Making big planter
https://www.instagram.com/p/BT2LZs2jcSM/?taken-
by=georgescatchardpottery